
…If you missed Part 1, check A Guide to Remodeling a Fixer-Upper | Part 1
A Little Paint Does A Lot in a Fixer-Upper
A little bit of paint goes a very long way in freshening up the look of any space. If an area is structurally sound, then a good scrubbing and paint can transform how it looks.
Check out the stairwell in this 1920’s bungalow:
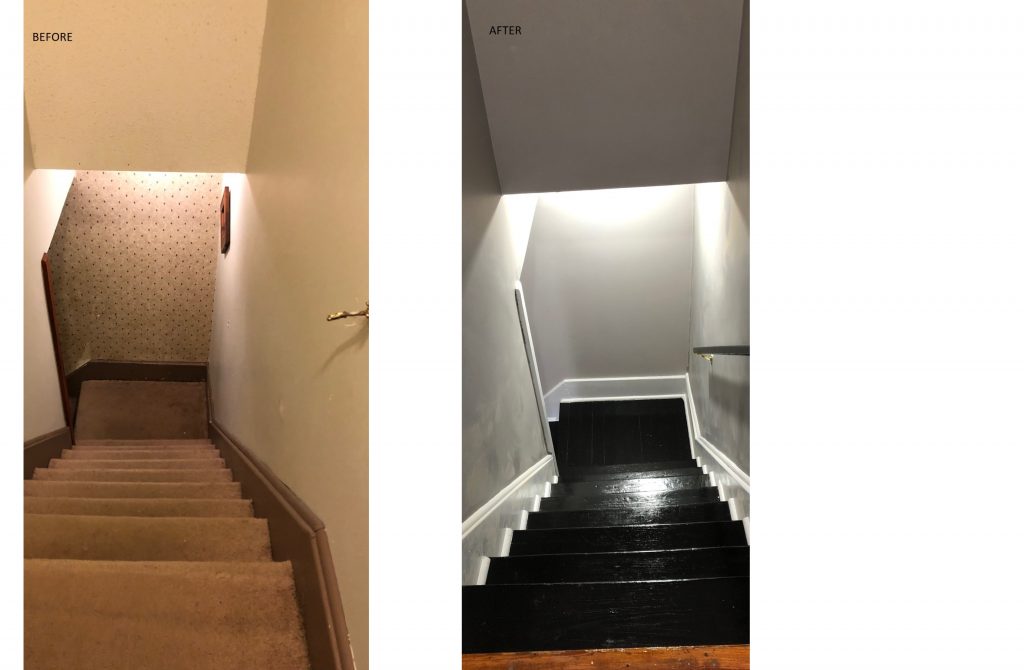
Removing the worn carpet and wallpaper didn’t require much in the way of materials or time. Then the space gets a fresh new look with a fresh coat of paint on the walls, new wood trim, and a coat of paint and urethane sealer on the stairs. Big, fresh new look with a small amount of time and budget for paint.
Remember, paint makes more than just walls look good. Check out the kitchen in this 80’s tract house.
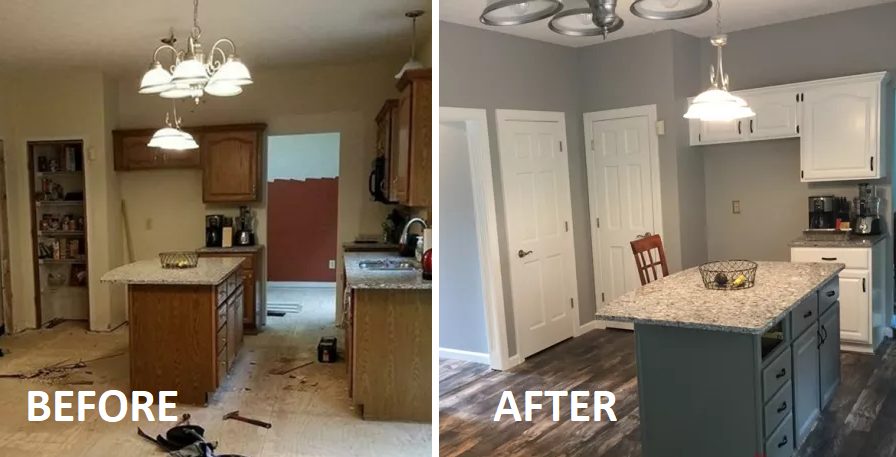
If the cabinets are structurally sound and you like the general style, then clean them up, sand them down, and give them a coat of paint. New cabinets would have added thousands and thousands of dollars to this renovation project. Instead, the kitchen got a major upgrade with new wood flooring and the cabinets and walls got a coat of paint. Bright white on uppers and lowers makes the room look larger and the blue paint on the island cabinets adds a sense of serenity.
With just a little paint!
Consider Eco-Friendly and Energy Saving Renovations
Does the fixer-upper need a new roof? Think about installing solar panels at the same time. These days, there are even options for leasing solar panels instead of purchasing them.
When purchasing your building materials and supplies, look for low VOC options. Volatile organic compounds (VOCs) are released by building products such as paint, carpet, glue, and stain. They degrade the quality of your indoor air, contributing to poor quality of air in the house.
These days, there are so many low VOC options there’s no reason to pollute your indoor air.
Getting Credit Where Credit is Due
Depending on the energy savings updates you make, you may be eligible for a credit on your federal income taxes.
The Consolidated Appropriations Act of 2021 extended many of the tax credits and even made some retroactive. There are even equipment tax credits for primary residences that will help you offset the cost of a new HVAC, hot water heater, boiler, or furnace.
Also, check with your state’s department of energy. The State of New Jersey offers rebates for energy-efficient equipment, as does Utah and Kentucky just to name a few. Also, check with local providers of natural gas or electricity.
Upcycle and Other Eco-Friendly Approaches
One man’s trash is another man’s treasure. Scour the local resale stores for bargains on lighting fixtures for your fixer-upper. Goodwill and Salvation Army are also great spots to find lighting.
View this post on Instagram
Habitat for Humanity ReStores operates in many areas. From appliances to building materials such as cabinets, bathtubs, doors, to appliances and furniture there’s something for every fixer upper at the ReStore. And if you see something you like, buy it. The inventory in these stores changes almost daily. If you come back tomorrow, that marble vanity for the bathroom may be gone and a leaded glass entrance door may be in its place.
When purchasing new building materials for your fixer-upper, look for eco-friendly options. For example, magnesium oxide panels (MagPanel or MgO board) use less energy to produce than other building materials and are so versatile you can use an entire panel without waste. Bamboo and eucalyptus are also eco-friendly and renewable as they are fast-growing plants that produce durable building materials.

Focus on Flooring
Chances are that your fixer-upper needs new flooring. While flooring is one of the last projects to be completed, it needs to be in the front of your planning. If the house is filled with old, soiled carpet, remove it at once. Even if you are walking on the cement slab or old laminate or tile, removing old dirty carpet is a quick and effective way to improve indoor air quality immediately. It’s amazing how quickly that “musty” smell goes away when the nasty carpet goes into the dumpster!
Knowing the type of floors you’ll eventually be installing help you determine the subflooring you will need to put down first. In addition, flooring sets the mood for a room. You want to make sure that your flooring and other elements complement each other.


Pick materials that are appropriate for the use of the room. Because flooring should last for many years, this is not one area where you want to cut the budget. Renovating the master bath? Consider waterproof floors like tile or flooring that has an SPC core. Pulling carpet up in the bedroom? Replace it with a healthier option like strand woven eucalyptus floors. Working on the entryway r living room? Pick an option that’s durable and good for high-traffic areas, like strand bamboo!
Create a Plan in Advance
Along with your budget, you need to create a plan of attack and then stick with it as carefully as you adhere to your budget. The approach you take should consider whether you plan on living in the home during the early stages of renovation or plan to move in later.
No matter what, always start by “drying in” the structure. This means that leaking roofs and broken windows are the first items to attack and have the highest priority. You’ve got to get the home dry and watertight before you do any other work.
Once the house is secured from the elements, you can either work room by room or system by system. Once again, the approach you take depends on the amount of work to be done. For example, if you must make major plumbing upgrades that impact the kitchen and bath, it might be best to handle those before you attempt to live in the house. Otherwise, you’ll find yourself living without the convenience of running water in the bathroom and kitchen. That’s like camping with a roof!
Room-by-Room Approach
If your fixer-upper doesn’t need major work and your renovations are largely cosmetic, you may want to take a room-by-room approach. Pick a room and complete all renovations before moving on to the next. For example, if a dining room simply needs wallpaper removed, decorative molding installed, and a fresh coat of paint, you may opt to do that room before tacking another.
This approach provides a sense of accomplishment, and you can enjoy the renovations as you continue to work.
Whole-House Approach
If the home requires extensive demolition and renovation, you may want to tackle the house as a whole. This approach reduces the cost of a roll-off dumpster because you only need it during the start of the project.
All demolition is done at once, then each major system is tackled one by one. Plumbing, electrical, and mechanical are completed sequentially. Next, you may hang new drywall, patch plaster, and repair walls in all the rooms in preparation for painting. All cabinetry is considered a single project as is all painting and floor work.
With this approach, you most likely won’t be able to live in the home until the later stages of renovation.
Avoid the Common Fixer-Upper Mistakes
Learn from the experiences of others. Here are the most common mistakes and how to avoid them:
- Mistake: Overestimating Your Abilities
Be honest with your ability to learn manual processes. If you aren’t comfortable working with your hands and using power tools, a fixer-upper isn’t for you. If you have patience, are open to learning new skills, and have some understanding of mechanics and physics then most DIY projects are approachable. Have a heart-to-heart with yourself. And the minute you realize you are in over your head, call in a pro.
- Mistake: Underestimating Your Time and Budget
The most common mistake novice DIY-ers make is underestimating the time and money it takes to do a job properly. Sure, you are saving money to do the job yourself, but it still takes money to buy supplies and building materials. Plan, plan, plan, and do so much research in advance that you know what building materials cost.
- Mistake: Not Checking References
There will be projects where it is best to hire a pro. Major plumbing, electrical, and gas-related projects need a licensed professional. So, check out who you hire. Don’t get the first person that’s available and the lowest price isn’t always the best price.

Ask for references, then check them out! Go online and look for reviews on social media and absolutely check with the Better Business Bureau.
- Mistake: Succumbing to Stressors
Renovating a house isn’t for the faint-hearted. Before you start, make sure your relationships and mental health are on solid ground.
Fixer-uppers offer a multitude of opportunities for stress. Stress about how quickly the work is being done, stress when something doesn’t go as planned, stress when that “magical” color of paint looks horrible on the walls, and stress from when you are simply tired and stressed.
Build a little time off into the renovation schedule for a little R&R. Take a night off and eat pizza and watch a movie if you need.
No matter what kind of home you choose to fix up, what renovation projects you decide to take on, or what you plan on doing once the fixer-upper is all fixed up, don’t forget to ENJOY the process when you can.

Happy renovating!

About the Author
Meet Bridgett, your friendly neighborhood green building guru! With more years of experience than she’d like to admit, Bridgett is your go-to expert for all things eco-friendly construction. She’s on a mission to make your home the envy of every tree hugger in town (and maybe even the squirrels 🐿️). Let’s build a greener, funnier, and all-around better world together – one enlightened eco-conscious choice at a time!