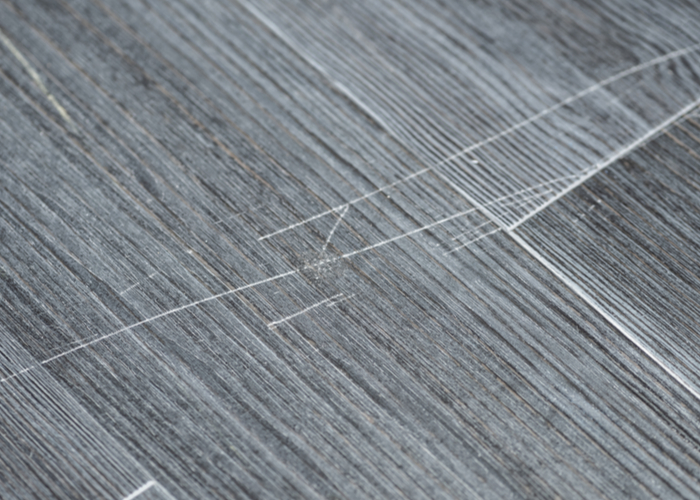
Now that you’re finally living with the beautiful wood floors of your dreams, it’s time to think about how you’re going to keep those gorgeous floors looking new. If you search “how to keep furniture from scratching wood floors” you’ll see advice such as sticking your bed in a corner or attaching roller casters to your furniture.
Well, if you aren’t keen on keeping your bed confined to the corner of the bedroom or living with rolling furniture, here are eight ways to keep your floors and furniture living together in harmony. It just takes a little creative thinking.
Did You Think About Scratches When Picking Your Floor?
Hopefully, you did some thinking about hardness and resiliency when selecting your floors. If you picked pine flooring, you picked wood on the wrong end of the Janka hardness scale. If you selected bamboo flooring, you picked the hardest flooring available and you are starting out with a hardwood floor that doesn’t scratch easily. Go you!
No matter what type of wood flooring you picked, you’ll want to use these tips to keep furniture from scratching wood floors and looking great for years.
Furniture Socks
You wear socks instead of shoes to protect your flooring, why shouldn’t your furniture do the same?
Yes, furniture socks are a real thing. Nancy Protectz built an entire business around furniture socks to protect wood floors from furniture scratches. Founder Nancy Rondina knew furniture from working in the family furniture business. What she didn’t know was how to keep furniture from scratching her new wood floors. So, she did a little creative thinking, created a solution, and then got patents for her unique furniture socks. The rest is history.
The cotton/spandex blend material stretches to accommodate furniture legs of various sizes and a rubber grip on the inside of the sock prevents the bottom of the leg from shifting. Nancy offers her furniture socks in different sizes and colors to contrast or complement the most popular wood finishes.
Do-It-Yourself Furniture Socks
If you want to get creative, you can make your own furniture socks. If it is a piece of furniture that doesn’t move often and has hidden legs/feet you can slip an old sock over the foot and hold it in place with a rubber band. This isn’t a great solution if the legs or feet are exposed, or the piece of furniture moves often (think barstool or chair at a table or desk). Like felt pads, those little socks are going to come loose. More on those pads later.
If you are really into DIY, check out this video. Emi shows you how to crochet decorative furniture socks in any size and color you want. You could even change your furniture socks for holidays and special occasions.
This approach is great for using up scraps of yard you might have hanging around. If you aren’t into crocheting, then read Hortense’s blog on how to knit DIY furniture socks. Be warned, she is an engineer and it shows in her creative approach to this problem.
Whether you buy or make your furniture socks, just be sure to take them off and toss them in the wash every so often. Like the felt pads we covered in our post on How to Protect Your Bamboo Floors From Scratching, these socks will pick up small bits of dirt and grit and these abrasives can scuff your floor if they are not kept clean.
Lift With Your Legs Not Your Back and Plan Plan Plan!
You’ve probably heard this advice over and over again, lift with your legs and not your back. This maxim prevents back strain and maximizes the strength of the large muscles in your legs.
Remember it. Because from now on you aren’t ever going to slide your furniture around on your hardwood floors. No matter how large or how small, you are going to pick your furniture up to move it. Or hire someone to pick it up and move it.
Seriously. Unload the books off the bookshelf and pick the furniture up to relocate it. Don’t rely on those plastic furniture glides you see advertised on the internet. Hard plastic glides work on carpeted surfaces but aren’t suitable for hardwood floors.
Why are you moving your furniture to and fro? Don’t work hard, work smart.
Plan first – move once
Use free downloadable 2D and 3D room planning software to design the room layout to your liking before you lift any furniture at all.
Digital tools like 3Dream and PlanYourRoom allow you to try out virtual furniture placements and visualize how a room will look without dragging that heavy couch from one end of the room to the other. Define wall, door, and window locations; specify dimensions; then start dropping and dragging that furniture virtually.
Once you know exactly where the furniture will be placed, pick it up and move it in place. This prevents gouging and scratching.
 Put a Rug On It

Queue your inner Beyonce and start singing “If you liked it then you should have put a ring on it.” Oh, wait, not ring – rug. If you like the way that hardwood floor looks, strategically put a rug on it.
Placing a rug on the floor may sound counterintuitive (to protect the beauty of my floor I must hide the beauty of my floor), but it’s all about where and how you place the rug.
Most effective use of rugs
Make sure you have rugs at all entrances. Rugs at the doors removed dirt and debris from the soles of shoes. Dirt on the bottom of your shoes creates small scratches (more about those later). Place a shelf, rack, or bookcase in the foyer or mudroom to store shoes when you come inside. Be like your dining room table and wear socks on your legs and feet.
Anchor large pieces of furniture with an area rug. The rug and padding protect the hardwood floors from the feet of the furniture as they visually delineate seating areas. The area rug doesn’t need to cover the room like a carpet, it should just cover the seating areas where furniture is located.
Rug backing matters
Don’t use rugs with jute backing. Jute is rough and abrasive. This can scratch the floor you are trying to protect. If the rug you’ve fallen in love with has a jute backing, place the rug on a separate pad.
Speaking of pads, choose your pad material wisely. Always opt for natural rubber over synthetic foam. To start, natural rubber is an organic material – so yay you for going green. Natural rubber doesn’t off-gas volatile organic compounds, so your room won’t smell like a toxic chemical soup. Synthetic foam degrades over time and heat and sunlight speed this process up. When the foam breaks down, it can adhere to the back of your rug – or even worse to your beautiful hardwood floor. Once the foam sticks to the floor, you’ve got a real problem to clean up.
Felt is another great choice for rug backing material. The felt won’t stick to the floor and provides a protective cushion against the weight of the furniture.
Protection in the Home Office
Today, the home office is as ubiquitous as the kitchen island. Almost every home has one. Office furniture poses challenges when it comes to protecting your hardwood floors from scratching.
Desk chairs roll for convenience, but certain types of casters damage flooring. To protect against furniture casters, you might put down a chair mat, but some chair mats mar wood floors. It’s time to think creatively again.
Debris-rejecting synthetic casters
Look for chair casters made from neoprene and polyurethane materials. These synthetic materials reject debris and won’t scratch your floors. Synthetics are universally quieter than wood or metal casters, so you enjoy fewer decibels as well as great protection for your floors. These casters roll smoothly and safely.
If your favorite office chair doesn’t come equipped with wood floor-compatible casters, just swap them out.
Smooth chair mats
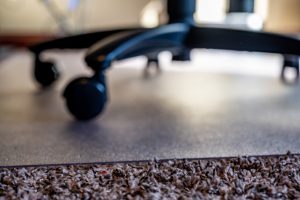 Chair mats to go under the rolling chair are great for protecting carpets and wood floors. But the mat you use to protect the carpet isn’t the same as the mat you use to protect your hardwood floors. Make sure to select a chair mat that is smooth on both sides. Many chair mats have a textured bottom surface or are outfitted with little grippers to hold the mat to the carpet.
The perfect chair mat for protecting your hardwood floors from rolling chair scratches is smooth on top and bottom and doesn’t contain foam or rubber that can adhere to the wood floor.
Vinyl chair mats are inexpensive, but they will curl and crack with use and age. This makes them a great low-cost alternative if you don’t mind replacing the mat every year or so. Polycarbonate mats last much longer and won’t curl or crack. They don’t cost much more than vinyl mats and are a better buy because of their longer life. But be careful, most polycarbonate mats are made for use on carpets!
For the ultimate in luxury and long life invest in a tempered glass chair mat. A simple ¼” of tempered glass can handle up to 1,000 pounds. A tempered glass chair mat can protect your floor from furniture while allowing the beauty of the wood to shine through. Your tempered glass chair mat will protect your wood floors from furniture and look beautiful for years.
A Paragraph or Two About Pads
No discussion about keeping hardwood floors protected from furniture would be complete without a mention of those little pads you can stick to the bottom of your chair legs and other furniture legs.
If you must use pads, stick with cork or felt. Choose felt before cork. Get the thickest felt you can find. Then make sure you stick the pad on securely. And once you put it on, keep an eye on it.
The biggest drawback to these little pads is they don’t stay where you put them for long. Especially if you secure them to a piece of furniture you move often (like the chairs at a dining table or barstools). Do you plop down on the couch at the end of the day or throw yourself into the waiting arms of a recliner? Well, each time you do this, your couch or recliner scoots just a bit. It’s not much, but over time it will create scratches in the hardwood floor. So keep that in mind when deciding what protection you use.
Once you stick those pads on, keep an eye on them. Look out for deserters that creep off the bottom of the chair or furniture foot and work their way up the leg. When the felt or cork gets dirty, pull the pad off and replace it. Grit on the bottom of the pad eliminates the protective properties and actually scratches the floors.
Oops! How to Repair Scratches in Your Hardwood Floors
Even with the best intentions, accidents can happen. Don’t despair! Take these steps to repair scratches created by furniture on your hardwood floor.
 Cover scratches in your walnut finish with a walnut. Seriously, crack a walnut and rub the meat into your scratch, then rub the scratch with your finger. The oils will penetrate and the stain from the nut will match your finish. Buff with a soft rag. Other household items suggested to cover scratches are olive oil, peanut butter, lemons, and even mayonnaise. These agents work by adding a small amount of moisture to the wood through the introduction of oil. The moisture causes the wood to swell and seal over the scratch.
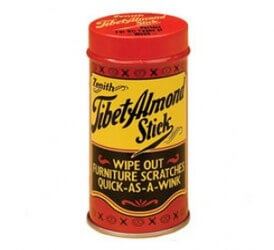
Ready to move on from kitchen ingredients to cover your scratch? Then grab a Tibet Almond Stick. No, it’s not from the Himalayas, it is a product made right here in the USA. Rub this wonderous stick on scratches and watch them disappear. The natural oils moisturize the wood and minimize the appearance of scratches. Yes, scratches and not gouges.
If you have a deep gouge, you can try a couple of things to hide it. If the flooring is dark wood, steep a tea bag with black tea (not green) in a few tablespoons of hot water. When the brew is the color of the wood, moisten a cotton bud with the tea and dab it into the gouge. Dab and wipe up excess repeatedly until you stain the scratch and make it less visible.
Old English makes a scratch cover for light and dark woods. Use these formulas carefully and be sure to wipe thoroughly. They are basically oils with a stain, and anything they touch will be stained.
If the gouge is very deep or wide, then it’s time to pull out the big guns. Cruise over to How to Repair Bamboo Flooring Scratches and find out how to repair and replace severely damaged flooring planks.

About the Author
Cheryl is our go-to guru for all things sustainable living. She’s on a mission to make your family and our planet thrive! With a heart as big as her passion for sustainability, Cheryl brings you the freshest insights on eco-friendly building products and energy efficiency. 🌱💡
And hey, did you hear about the eco-friendly lightbulb that went to therapy? It finally found its inner “enlightenment”! 😄 Join Cheryl on this green journey, where she’ll tackle your concerns with a smile and a sprinkle of eco-humor!