
Last Updated: 10/19/2021
When installing bamboo flooring, you have numerous options, including floating, nailing, or gluing down. The glue-down method provides some distinct advantages, such as sound and moisture insulation. A common question involves how long a wait is required to walk on floors after a glue-down installation.
How Long After Gluing My Floor Down Can I Walk On It?
This answer can usually be found on the instructional label on the side of your glue bucket. Different adhesive brands will have different cure times, and sometimes it also depends on the humidity and temperature. Most urethane flooring adhesives will fully cure 12-20 hours after they’re laid, depending on the humidity levels of the environment in which they’re installed. It’s generally advised that glued down floors will accept light traffic in 12-15 hours and heavy furniture 24 hours.
Benefits of Gluing Down Floors
The glue-down method provides a host of benefits that cannot be achieved through other methods, including:
- Insulation against sound: Some wood glues dampen sound and may absorb some of the vibrations from people walking or moving objects across the floor.
- Protects against sub-floor moisture: Moisture barrier glues are also available that eliminate the need for additional underlayment (and therefore save you time during the installation process).
- Allows for natural expansion and contraction: Hardwood flooring adhesives are surprisingly elastic, allowing your floor to expand and contract naturally to prevent warping.
- Limits movement: While glue does contain elastomeric properties, it limits movement, ensuring a tight, strong bond and a very secure floor.
- Leaves no unsightly nail marks that might detract from your floor’s appearance.
Two Basic Glue Types
Two basic types of glue may be used on bamboo flooring:
- Urethane wood flooring adhesive, which is a moisture-cured urethane that securely adheres planks to plywood, ceramic tile, LVT tile, and other surfaces
- Urethane wood flooring adhesive with vapor and sound barrier, which contains added vapor and sound insulation and is ideal for gluing down to concrete or on upper-level applications where soundproofing is desired
If you’re looking to explore the differences in various wood flooring adhesive products and compare their specifications, then check our Adhesives products.
Common Questions about Glue
Below are some answers to some of the most frequently asked questions about glue:
1) What is a moisture-cured urethane? An adhesive that cures or dries when it is exposed to moisture is known as moisture-cured urethane. Moisture-cured urethanes come with a tack time and cure time that is related to temperature and humidity. For example, a container opened in southern Florida may dry in 10 hours but could take up to 18 hours to dry in Colorado’s high desert. Knowing the cure and tack time helps the installer avoid putting boards in too early or too late.
2) How do I know if I need moisture protection? Anytime you are covering a crawl space, concrete, or unconditioned space, you must use moisture protection. Moisture is measured in pounds on concrete slabs, and basic adhesives protect up to three pounds per square foot of moisture. Upon testing your concrete, you may find that it comes back higher than that, in which case moisture protection is required. Remember that a moisture test only records the moisture level on that day, so you should take multiple readings on different days to ensure greater accuracy. Check the upper moisture limit on any adhesive you buy to ensure it meets your requirements.
3) Can you explain the adhesive and sound barrier feature? The IIC and STC tests are sound tests used to rate adhesives and underlayment, and the higher the score, the better protection they will provide. Most condos require soundproofing between 50 and 60, which can often be achieved using glue with a high sound barrier rating. Sound barrier glue eliminates the need for a corkboard or other materials and allows you to avoid the costs associated with their installation.
4) What about trowels and adhesive remover wipes? When using the glue-down method, make sure you have adhesive remover wipes nearby. If glue accidentally spills onto the bamboo flooring planks during installation, immediately use the adhesive remover wipes to remove the spilled glue from the planks’ top. Otherwise, once the glue dries, it is nearly impossible to remove without damaging the finish, which will result in having to cut out and replace the affected planks. So it is paramount that you use the adhesive wipes while the glue is still wet. Accidents happen, but be sure to work quick. Worst comes to worst, you can follow these steps for adhesive removal to clean up as best as you can!
When it comes to trowels, the importance of using the right one for the job cannot be overstated. For example, our vapor barrier adhesive should only be applied with a 1/4″ x 1/4″ V Notch Trowel. Use the wrong trowel, and you could experience improper spread rate or coverage, thereby rendering the glue useless. In the case of vapor protection, it will nullify the moisture seal, causing your floor to absorb moisture and your boards to cup or curl upward on the ends.
Preparing for Installation
Once your planks have acclimated, you will need to prepare your subfloor by:
- Sanding the surface to make it is level and even
- Filling any low areas to prevent dips and grinding down any bumps
- Checking the moisture level of your subfloor to ensure it is within the range recommended by the manufacturer’s technical datasheet
- Thoroughly cleaning your floor, which should include removing any existing adhesive residue.
You are now ready to begin installation; however, we do not recommend you start laying bamboo just yet. Your flooring contains variations in a pattern that should be accounted for first. Layout your planks so you can sort them accordingly. Dye lots also vary, so sorting is essential if you use bamboo from more than one batch. It is good to purchase around 10% more than you anticipate using; this will ensure you always have material on hand to make repairs with.
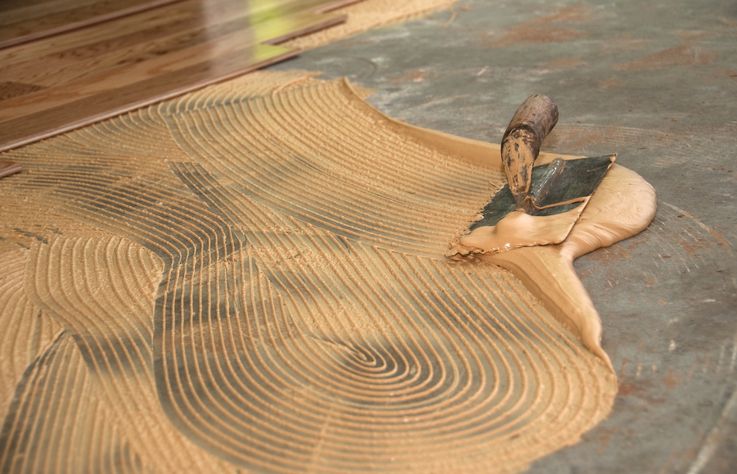
Steps in the Glue-Down Process
Leave a ten-millimeter expansion gap around the edges of your room as well as any doorways. Spread the adhesive using a hand trowel held at a 45-degree angle. Your finished product should contain ridges or grooves but should nonetheless be very smooth. Lay your first row of flooring parallel to the longest exterior wall in your room. Do not slide boards through the adhesive, but rather place the long tongue into the shorter adjoining end and adjust as needed. Make sure each plank is tightly butted against the other before installing the next one. Tap the edges lightly with a soft rubber mallet using a piece of scrap material as a buffer. Continue working backward from the first row, so you’re not working directly on top of newly-installed planks. If you cannot avoid being on top of new planks, use a kneeler board to ensure your weight is evenly distributed.
Glue Down Pointers
Following certain best practices will allow you to walk on your flooring sooner and make it less prone to wear and tear when you do. Here are some things you should keep in mind any time you are gluing down bamboo planks:
- Make sure the ends of adjacent rows are staggered at least eight inches apart.
- Clean any excess residue off as you go using the adhesive remover wipes or mild soap, water, and a soft cloth.
- Maintain room temperature at around 70° F or so to keep your glue at an even consistency.
- When spreading glue, do not work too far ahead of yourself.
- Check how well your planks are holding by lifting one every often to see how secure it is. For best results, at least half of the adhesive should “transfer” onto the back of your flooring.
- Place weighted boxes or objects on the recently glued planks to ensure a strong bond to the floor. You can also “roll” or walk the floor to weight it down.
Walking on Floors and Moving Furniture In
Immediately after laying your floors, you can walk on them lightly to “weight” them in place. We advise homeowners to tread lightly or to use a kneeler board as described above alternately. Once you have weighted your floors, please stay off of them entirely for the recommended time in the instructional label on the side of the bucket. After that time, it is perfectly safe to begin walking on them normally. You may want to wait a bit longer before moving heavy furniture on your new floor. Ideally, you should hold off at least 12 hours to ensure the glue has had enough time to set.

About the Author
Jen is your go-to guru for crafting a cozy, green cocoon. 🪴 Her dive into sustainable building wasn’t just about saving the planet—it started as a mission to make family movie nights eco-friendly (and to ensure the popcorn was the only thing getting heated!). With a knack for breaking down the jargon, Jen turns eco-lingo into everyday language. Swing by the Green Living blog for a mix of earth-loving advice and home improvement hacks. Whether you’re just dipping your toes into green waters or you’ve been swimming in the deep end of DIY projects, Jen’s here to guide, giggle, and remind you that every eco-choice is a step towards a planet that thanks you… and maybe even sends a rainbow your way! 🌈